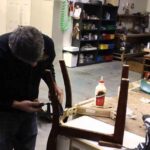
To remodel a bathroom, start by planning your budget and design ideas. Measure the space and decide on layout changes, like moving fixtures or adding storage.
Next, choose materials such as tiles, counter tops, and fixtures. Hire professionals for plumbing, electrical work, and construction if needed. Demolish the old bathroom carefully, then install new features like a shower, bathtub, toilet, and vanity.
Finish with painting, flooring, and adding accessories for a refreshed and functional bathroom space.
Tips For Gutting A Bathroom
Gutting a toilet calls for cautious planning and execution. Here are a few guidelines.
- Put together the space: remove all non-public items, furnishings, and accessories from the bathroom. Guard floors and partitions with drop cloths or plastic sheeting.
- Shut off Utilities: turn off the water supply and electricity to the bathroom before beginning any demolition paintings. This ensures safety and forestalls harm to plumbing and electric systems.
- Wear shielding equipment: put on protection goggles, gloves, and a dust mask to protect you from particles, dirt, and capability hazards in the course of demolition.
- Begin with furnishings: do away with fixtures like the bathroom, sink, bath, and bathe first. Use appropriate tools to disconnect plumbing and cast off fixtures carefully to avoid adverse surrounding surfaces.
- Cast off Wall Finishes: if you’re gutting the rest room down to the studs, do away with wall tiles, drywall or other wall finishes the usage of a pry bar, hammer, or reciprocating saw.
- Demo walls and flooring: Use a sledgehammer or demolition hammer to interrupt down partitions and flooring. Start from the top and work your way down, taking care to do away with substances thoroughly and keep away from adverse structural elements.
- Eliminate debris: hire a dumpster or arrange for particles elimination to eliminate demolition waste effectively. Sort substances for recycling if viable.
Look at Structural factors: once the rest room is gutted, investigate structural factors like studs, joists, and subflooring for harm. Make maintenance as needed before intending with the upkeep.
Read This Blog: HOW TO TELL IF FUSE IS BLOWN IN HOUSE
- Plan Plumbing and electrical paintings: in case you’re making adjustments to the format or adding new fixtures, plan plumbing and electric work cautiously earlier than closing up partitions.
- Recollect hiring specialists: Demolition may be physically traumatic and potentially risky. If you’re no longer assured for your skills or if the venture entails complicated structural adjustments, remember hiring specialists for demolition and protection work.
Via following these tips and taking suitable safety precautions, you can successfully intestine a toilet to put together for an upkeep challenge.
Get Rid Of Renovation Debris Easily By Renting A Dumpster.
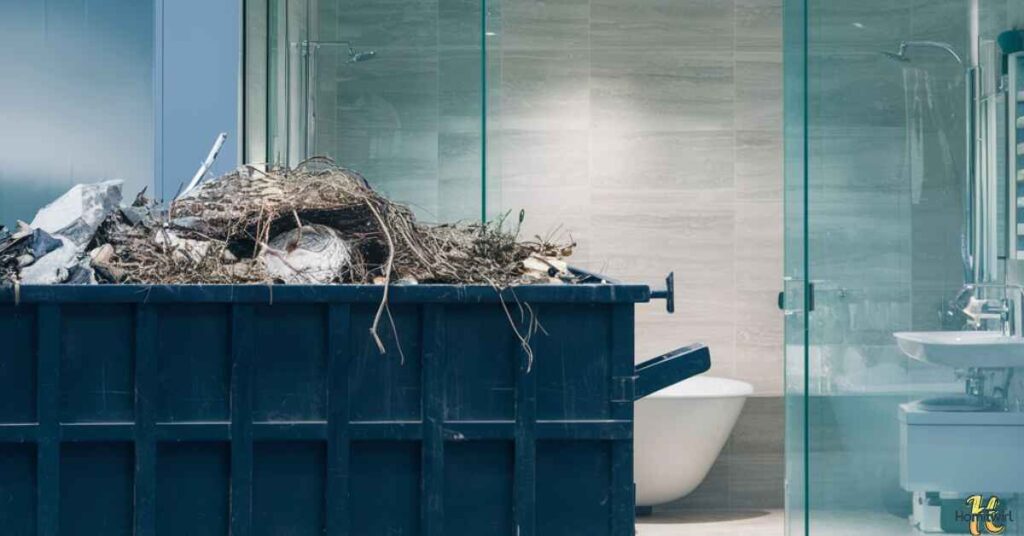
Renting a dumpster is an efficient way to dispose of renovation debris. Simply choose a dumpster size that suits your needs, schedule delivery and pickup times with the rental company, and fill the dumpster with debris from your renovation project.
Once you’re finished, the rental company will haul away the dumpster and dispose of the debris for you, saving you time and hassle.
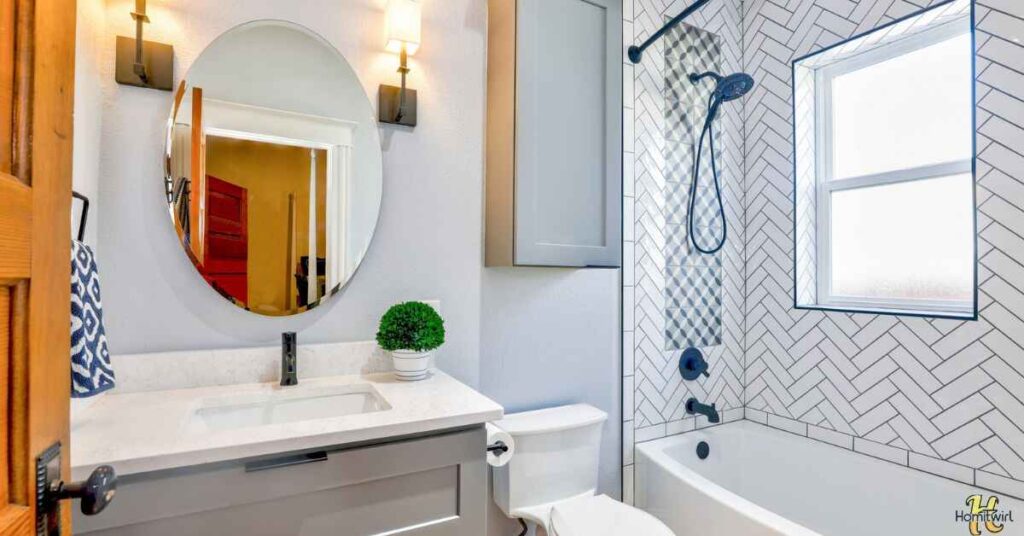
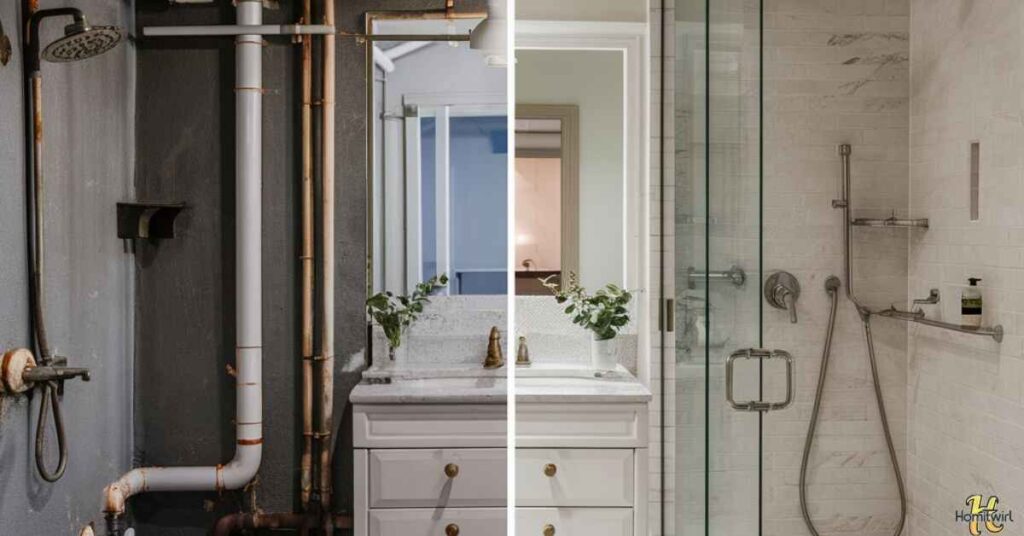
Install the New Shower or Tub
Installing a brand new shower or bath is a key step in toilet upkeep. Here’s how.
- Training: make sure the plumbing rough-ins is in location. Measure the space to make certain the new fixture suits nicely.
- Select the Fixture: choose a bath or tub that suits your design alternatives, finances, and space constraints. Recall factors like fabric, style, and capabilities.
- Acquire supplies: acquire all important gear and materials, such as the shower or bath unit, plumbing fixtures, caulking, waterproofing materials, and installation hardware.
- Close off Water: turn off the water deliver to the rest room. Drain any closing water from the plumbing traces.
- Dispose of vintage Fixture: Disconnect and remove the old bathe or tub unit cautiously, taking care not to harm surrounding walls or floors.
- Put together the location: easy the installation place very well and make sure the ground and walls are degree and nicely supported.
- Set up the new Fixture: comply with the manufacturer’s commands for putting in the brand new bathe or bath unit. Comfortable it in location the use of appropriate fasteners and waterproofing methods.
- Connect Plumbing: join the plumbing fixtures, which include the drain, water deliver lines, and any extra functions including a showerhead or hand sprayer.
- Test for Leaks: turn the water supply lower back on and test the new fixture for leaks. Take a look at all connections and joints for signs and symptoms of water leakage.
- End the surroundings: Seal the rims of the shower or bath unit with water-proof caulking. Installation any extra capabilities which include bathe doorways, surrounds, or trim.
- Cleanup: smooth up any debris or mess left from the set up method. Ensure the location is tidy and ready to be used.
By means of following these steps and making sure right installation, you can efficiently installation a brand new bathe or tub as a part of your bathroom maintenance assignment. In case you’re uncertain about any element of the setup, consider hiring an expert plumber or contractor for help.
Also Read This Blog: HOW TO UPDATE CHERRY DINING ROOM FURNITURE
Lay the New Flooring
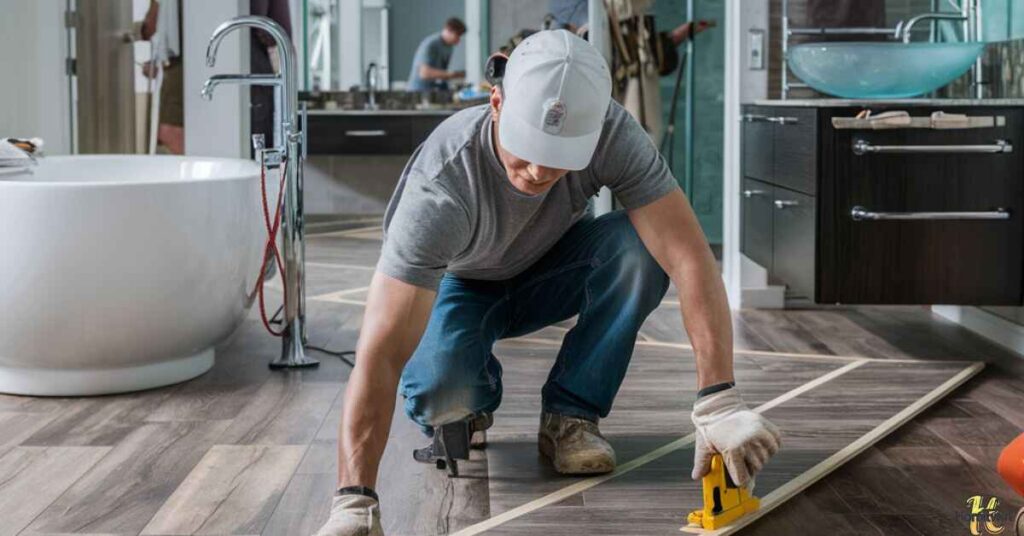
Laying new flooring is a substantial step in toilet preservation. Here’s the way to do it.
- Choose floors: pick a flooring cloth appropriate for toilets, consisting of ceramic tile, porcelain tile, vinyl, or water-resistant laminate. Do not forget sturdiness, moisture resistance, and aesthetics.
- Prepare the Subfloor: ensure the subfloor is smooth, dry, and stage. Restore any broken areas and dispose of old flooring materials if necessary.
- Measure and Plan: measure the bathroom area as it should be to determine the quantity of flooring cloth needed. Plan the format, thinking about elements like tile size, styles, and placement around furniture.
- Collect materials: acquire all important equipment and materials, such as floors tiles or planks, adhesive or mortar, grout, spacers, a tile cutter, a level, and a trowel.
- Start from the center: start laying the floors from the middle of the room, operating outward. Use a chalk line to establish a reference line and make certain tiles is laid directly and lightly.
- Apply Adhesive: observe adhesive or mortar to a small location of the subfloor using a trowel, starting from the reference line. Paintings in sections to prevent the adhesive from drying out before laying the floors.
- Lay the flooring: area tiles or planks onto the adhesive, pressing them firmly into vicinity. Use spacers to preserve regular spacing among tiles. Take a look at periodically with a stage to make sure the flooring is flat and even.
- Reduce Tiles: Use a tile cutter to reduce tiles as had to healthy around edges, corners, and furniture. Measure cautiously and make unique cuts to make sure a professional-looking finish.
- Allow to Set: permit the adhesive or mortar to set consistent with the manufacturer’s instructions before grouting. This typically takes 24 to forty eight hours.
- Grout Joints: once the adhesive has set, take away spacers and grout the joints among tiles. Use a grout flow to apply grout lightly, and then wipe away excess grout with a damp sponge.
- Seal Grout (if vital): If using porous grout, follow a grout sealer in keeping with the producer’s commands to guard against moisture and stains.
- Cleanup: easy up any extra grout or adhesive from the floor of the tiles. Allow the flooring to dry completely before strolling on it or transferring furnishings back into vicinity.
Through following those steps and taking a while with the set up process, you may reap a lovely and durable new floor to your lavatory renovation. In case you’re uncertain approximately any factor of the setup, take into account hiring an expert flooring installer for assistance.
Hang Drywall and Start Painting
Hanging drywall and painting are essential steps in finishing a rest room renovation. Right here’s the way to proceed.
- Put together the partitions: ensure the walls are smooth, dry, and free of debris. Repair any harm or imperfections before hanging drywall.
- Degree and reduce Drywall: degree the size of the partitions and ceiling, then use an application knife or drywall noticed to cut the drywall sheets to length. Make cutouts for outlets, switches, and furniture as needed.
- Deploy Drywall: begin via attaching drywall to the ceiling using drywall screws or nails, spacing them frivolously along the studs. Then, connect drywall to the walls, starting from one nook and working your manner across. Depart a small gap among sheets for enlargement, and use shims to ensure a flush match.
- At ease and Tape Seams: comfy drywall sheets with screws or nails, making sure they’re flush with the studs. Observe drywall tape over the seams, and then cover them with joint compound the use of a drywall knife. Easy the compound and permit it to dry completely.
- Sand and prime: as soon as the joint compound is dry, sand the seams easy and apply a coat of primer to the whole floor of the drywall. This could help the paint adhere lightly and offer a uniform finish.
- Paint: select a paint appropriate for toilets, which includes a mildew-resistant or moisture-resistant method. Use a brush or roller to use paint flippantly to the walls and ceiling, running in small sections and the usage of long, smooth strokes.
- Apply extra Coats: relying on the color and insurance, you can want to apply more than one coats of paint to acquire the favored end. Permit every coat to dry completely earlier than applying the following.
- Finish and easy Up: as soon as the final coat of paint is dry, look into the walls and ceiling for any imperfections or contact-u.s.a.wished. Smooth up any paint drips or spills, and dispose of any shielding coverings from furniture or surfaces.
By way of following these steps and taking a while with the drywall installation and painting procedure, you could gain a professional-looking end on your lavatory maintenance.
In case you’re unsure approximately any component of the installation, recall hiring a professional dry Waller or painter for assistance.
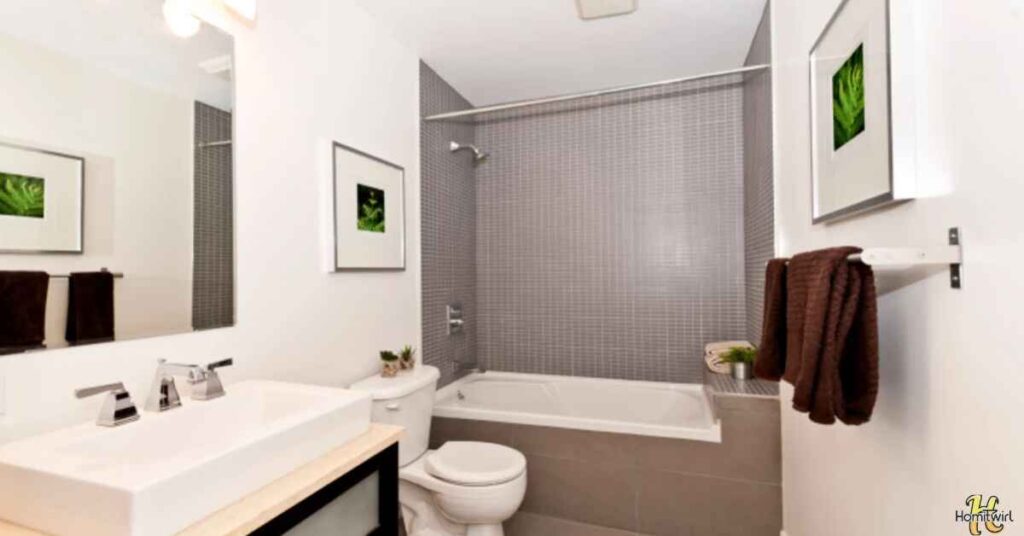
Install Cabinets and Vanity

Installing cabinets and an arrogance for your bathroom can substantially decorate its capability and aesthetics. Here’s a step-with the aid of-step manual to help you via the system.
- Degree and Plan: degree the size of your rest room space and plan the layout of the cabinets and arrogance. Consider elements including plumbing, electric outlets, and any obstructions that can affect installation.
- Pick cabinets and conceitedness: pick out cabinets and conceitedness that healthy your area and style possibilities. Ensure they’re product of durable substances suitable for the rest room surroundings.
- Accumulate equipment and materials: collect all the vital tools and materials for the setup, together with a drill, screwdriver, stage, tape degree, shims, screws, and anchors.
- Put together the vicinity: clean out the space in which the cabinets and vanity can be hooked up. Get rid of any old furnishings and smooth the vicinity very well.
- Install higher shelves: if you have top shelves, begin via installing them first. Use a stud finder to discover and mark the studs at the wall. At ease the shelves to the studs the use of screws, making sure they’re stage and aligned well.
- Set up the vanity cupboard: region the arrogance cupboard in its targeted function. Use shims to level it if essential. At ease the vanity to the wall the use of screws, ensuring its miles anchored securely.
- Connect Plumbing: in case your conceitedness includes a sink, connect the plumbing. Install the faucet, drain, and water supply traces in line with the producer’s commands. In case you’re now not comfortable with plumbing, take into account hiring an expert.
- Set up Countertop and Sink: if your conceitedness has a countertop, vicinity it on top of the cupboard and cozy it in area. Deploy the sink according to the manufacturer’s commands, ensuring it is properly sealed.
- Finish paintings: add any completing touches inclusive of trim pieces, handles, or knobs to the shelves and arrogance. Take a look at for any gaps or choppy surfaces and make modifications as wanted.
- Test capability: test the functionality of the shelves and conceitedness, ensuring that doorways and drawers open and close easily. Take a look at for any leaks or troubles with the plumbing.
- Clean Up: easy up any particles and dirt from the set up procedure. Experience you’re newly hooked up cabinets and conceitedness!
In case you’re not assured in your DIY competencies, recollect hiring an expert contractor or handyman to assist with the installation. They are able to make certain that the shelves and conceitedness is installed successfully and correctly, giving you peace of mind and a stunning bathroom space.
Update Lighting
- Updating the lighting fixtures on your rest room can notably enhance its capability and environment. Here’s a guide that will help you replace the lighting correctly.
- Investigate modern-day lighting: examine your cutting-edge lighting setup and identify any deficiencies or regions for development. Don’t forget factors inclusive of brightness, shade temperature, and location of furnishings.
- Decide your wishes: determine your lighting fixtures needs based on the dimensions and layout of your toilet, in addition to your private possibilities. Determine if you want assignment lights for activities like shaving or applying make-up, ambient lights for standard illumination, and accessory lights to highlight features or decor.
- Pick out lights: choose lights that meet your wishes and complement the fashion of your lavatory. Popular options consist of overhead ceiling lighting, wall sconces, arrogance lights, recessed lights, and LED mirrors. Consider power-efficient LED fixtures for long-lasting and price-effective lighting.
- Plan Fixture Placement: Plan the location of lights to ensure even illumination in the course of the toilet. Set up project lights near the conceitedness location to decrease shadows and provide good enough lights for grooming duties. Role ambient lighting to offer basic illumination, and use accessory lighting to spotlight architectural capabilities or decor.
- Recollect lighting Controls: include lighting fixtures controls which include dimmer switches or clever lights structures to regulate the brightness and atmosphere consistent with your options. Dimmer switches assist you to control the intensity of the mild, even as smart lighting systems may be programmed and managed remotely the use of a smartphone or voice commands.
- Set up lighting: set up the selected lights in keeping with the manufacturer’s commands. In case you’re no longer comfy with electrical work, hire a certified electrician to make sure safe and right installation. Make sure to turn off the electricity to the circuit before running on any electrical wiring.
- Take a look at and modify: test the newly mounted lighting fixtures to make certain they’re functioning well. Make any essential modifications to the location or brightness of the furnishings to acquire the desired lighting fixtures impact.
- Add decorative factors: do not forget adding decorative factors along with lighted mirrors, pendant lighting fixtures, or ornamental sconces to decorate the classy attraction of your toilet. Those factors can serve as focal factors and upload personality to the space.
- Normal preservation: preserve your lights often by way of cleaning them and replacing any burnt-out bulbs. Keep the furnishings free of dirt and particles to make sure premier performance and sturdiness.
By using following these steps, you could update the lighting on your bathroom to create a nicely-lit and welcoming area that meets your desires and complements your daily habitual.
Hook Up the Plumbing
Connecting the plumbing in your bathroom is like putting together pieces of a puzzle. It’s important to make sure water flows smoothly and doesn’t leak. Here’s how to do it.
- Get the Right Parts: You’ll need pipes, connectors, and possibly tools like wrenches.
- Follow the Instructions: Check any manuals that came with your sink or toilet. They’ll show you how things fit together.
- Attach Pipes: Use connectors to join pipes together. Make sure they’re tight so water doesn’t leak.
- Turn on the Water: Once everything’s connected, turn on the water to see if there are any leaks. If there are, tighten the connections.
- Test It Out: Run the sink or flush the toilet to make sure water goes where it’s supposed to and nothing leaks.
- Ask for Help if Needed: If you’re not sure what to do, it’s okay to ask for help from someone who knows about plumbing.
Following these steps will help you hook up the plumbing in your bathroom easily and make sure everything works just right.
Frequently asked question
How lengthy does it take to remodel a bathroom?
The timeline varies relying at the scope of the redecorate, but it typically takes several weeks to a few months.
Do I want a allow to rework my lavatory?
It relies upon on the volume of the redesign and neighborhood constructing codes. Take a look at with your neighborhood government to determine if a permit is required.
What is the average value of a toilet remodel?
The fee can vary broadly depending on elements like materials, exertions, and the dimensions of the toilet, but its commonplace to budget several thousand greenbacks for an entire redecorate.
Am i able to remodel my lavatory myself, or do I need to hire a professional?
It depends in your DIY skills and the complexity of the redecorate. Simple updates like portray or replacing furnishings may be DIY tasks, but more huge renovations may require professional help.
How can i make my rest room greater throughout the redesign?
Recall putting in water-saving furniture, power-efficient lighting, and sustainable materials like bamboo floors or low-VOC paint.
What are a few space-saving thoughts for a small lavatory remodel?
Utilize vertical garage, install a nook sink or bathe, and pick mild colors to create the illusion of more area.
How do I select the proper bath or bathe for my remodel?
Recollect elements like area, price range, and personal preference. Alternatives include freestanding tubs, walk-in showers, and mixture bathtub/bathe devices.
What need to I do if I come upon surprising issues during the redecorate?
Stay flexible and price range extra money and time for unforeseen issues. Talk together with your contractor or are trying to find professional help to address any challenges that get up.
Conclusion
Remodeling a bathroom can be a rewarding endeavor, enhancing both the functionality and aesthetics of your home.
By carefully planning your project, selecting the right materials and fixtures, and potentially seeking professional assistance when needed, you can transform your bathroom into a space that meets your needs and reflects your personal style.
Whether you’re making simple updates or undertaking a complete renovation, the end result can greatly enhance your daily routine and the overall value of your home.